Measure your rice with the cup that came with your cooker, rinse it until the water runs mostly clear, then fill to the matching inner-pot line, or use roughly 1 to 1.25 cups of water per cup of rice if there's no line to follow. Press start, let the machine switch itself to Keep Warm, then rest the rice for 5 to 10 minutes before you fluff it. Watch for steam when you lift the lid; it's hot enough to burn.
TL;DR:
- Using the correct rice measuring cup, usually about 180 mL, is essential to avoid mushy or crunchy rice caused by inaccurate water ratios.
- Rinsing rice two to three times until water runs clear removes surface starch and prevents gummy texture, especially important for sticky rice varieties.
- For white rice, the standard water-to-rice ratio is about 1 to 1.25 cups of water per cup of rice, with adjustments based on personal texture preferences.
- Opening the lid during cooking or overfilling the cooker can lead to uneven texture and spills, so it is best to keep the lid closed until the cycle finishes.
- A resting period of 5 to 10 minutes after cooking improves rice texture by redistributing moisture, making it more tender and glossy.
Table of Contents
- Rice cooker basics: how does the appliance actually work?
- How to use a rice cooker: a step-by-step process for beginners
- What is the correct water-to-rice ratio for a rice cooker?
- Common rice cooker mistakes beginners make (and how to fix them)
- What else can you make in a rice cooker besides plain rice?
- How Adulting in the Kitchen builds your rice cooker confidence
- A short pep talk for new independent cooks
- Want guided practice instead of trial and error?
- Sources
Rice cooker basics: how does the appliance actually work?
A rice cooker isn't smart in the way a slow cooker or oven timer is smart. It's mechanically dumb in the best way, and that's exactly why it's so hard to mess up once you understand the trick.
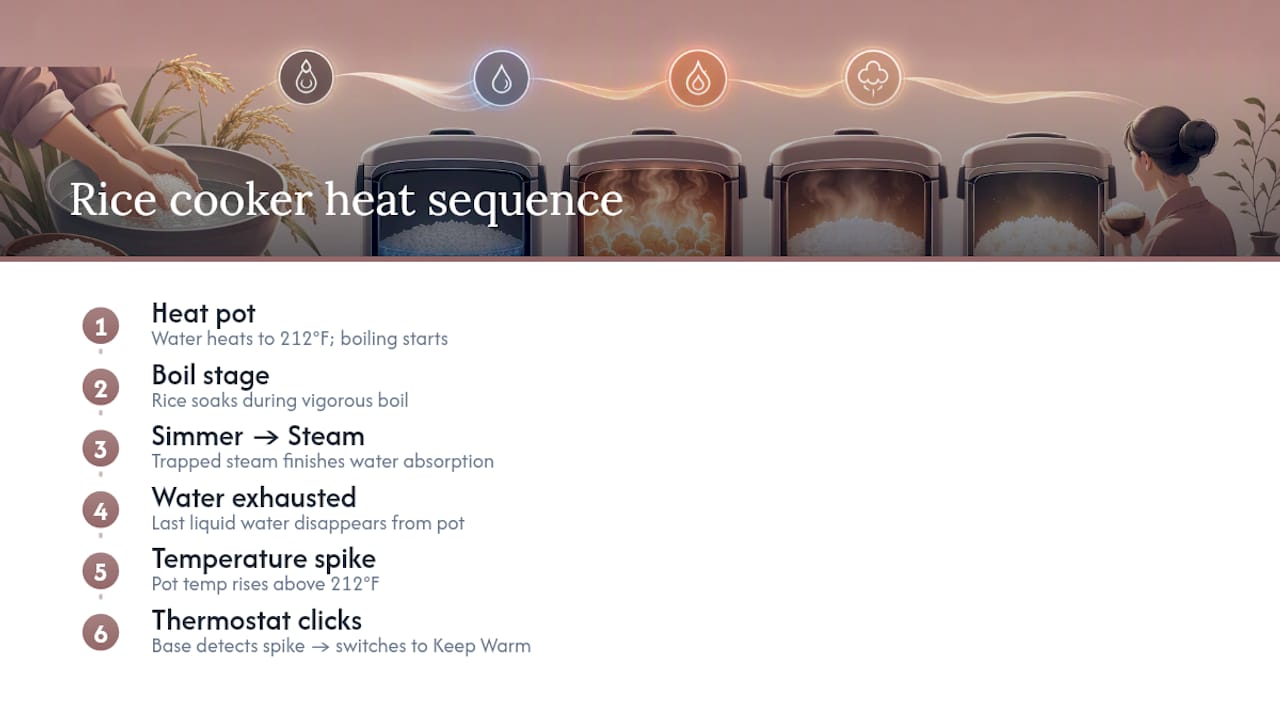
Here's the physics in plain terms: water boils at 212°F and won't get any hotter no matter how much heat you throw at it, as long as liquid water is still present. Your rice cooker uses that fact as a built-in off switch. It heats the pot, the water boils, the rice absorbs the water through a boil then simmer then steam sequence, and once the last of the water disappears, the pot's temperature finally climbs past 212°F for the first time. A thermostat in the base detects that spike and clicks the cooker over to Keep Warm mode, according to Zojirushi's explainer on conventional rice cooker mechanics.
That's the entire mechanism behind basic cook and warm models. No sensors reading grain type, no adjusting for altitude. It just waits for water to run out, then stops.
Opening the lid mid-cycle breaks this system in a real way. You let steam escape, which drops the internal pressure and temperature right when the rice needs steady, trapped heat to finish absorbing water evenly. Stirring does something similar by disturbing the layer of rice sitting against the hot pot bottom, which can cause scorching or uneven texture. Leave the lid shut until the cycle finishes.
Fuzzy-logic and induction heating (IH) models add microprocessors and temperature sensors that adjust cook time and heat curves for different rice types, from sushi rice to brown rice to porridge settings. That's genuinely useful if you cook a wide variety of grains, but it also means their manufacturer settings matter more. A basic cooker treats every rice the same way; a fuzzy-logic model is actively deciding how to treat yours, so following its specific instructions pays off more than it would on a bare-bones machine.
How to use a rice cooker: a step-by-step process for beginners
Before you do anything else, find your cooker's manual or a photo of it online and note where the inner-pot water lines sit. Every brand marks these slightly differently, and the supplied measuring cup is typically about 180 mL, not the 237 mL of a standard US measuring cup. Mixing the two up is the single most common reason beginners end up with mushy or crunchy rice.
- Measure the rice. Use the rice cooker's own cup, and level it off with your finger or a knife rather than packing it down. A packed cup means more rice than the water line accounts for.
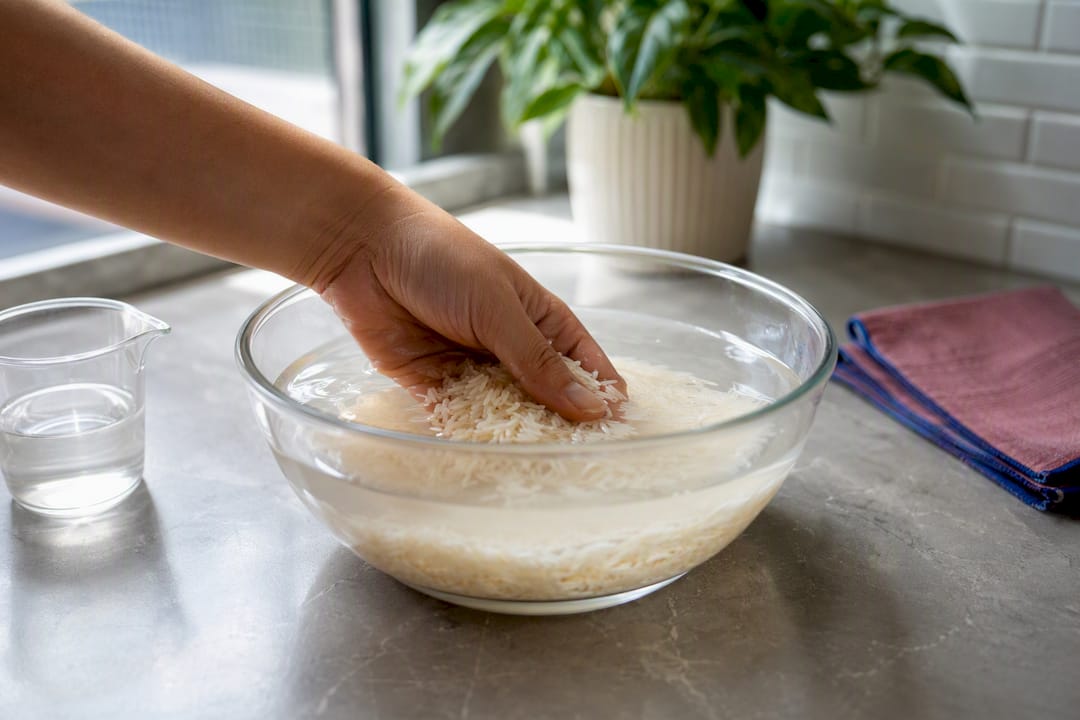
- Rinse it. Add cool water to the pot or a separate bowl, swirl the rice gently with your hand, then drain. Do a quick first rinse and dump it fast, since dry rice will otherwise start soaking up any bran dust or packaging residue sitting on the surface, per Tiger's rice-cooking guide.
- Repeat the rinse two or three more times, until the water runs mostly clear instead of cloudy white. This step removes surface starch, and skipping it is the top reason rice turns gummy, according to a chef interviewed by Real Simple.
- Drain well. Tip the pot or strainer to get rid of excess water clinging to the grains.
- Add water to the matching line for the amount of rice you measured. If your cooker has no lines at all, use about 1 to 1.25 cups of water per cup of white rice, a ratio backed by Good Housekeeping's rice cooker guide.
- Wipe the outside of the inner pot dry and set it back in the base. A wet exterior can cause uneven heating or trip the machine oddly.
- Close the lid and press start. If your model has multiple settings, choose Plain or White Rice rather than Quick Cook when you have the extra time; manufacturers note that quick modes trade some steaming time for speed, which can leave rice slightly firmer.
- Wait for the click. The indicator light will switch from Cook to Keep Warm on its own. Don't lift the lid to check progress.
- Rest for 5 to 10 minutes with the lid still closed. This resting period lets trapped moisture redistribute through the grains instead of pooling at the bottom, which does more for texture than extra cook time would, per Good Housekeeping.
- Fluff with a rice paddle, cutting and folding from the bottom up rather than stirring in circles, which keeps grains intact and glossy instead of crushed.
Pro Tip: Keep the measuring cup stored inside the rice bag or right next to your rice container. It's a tiny habit, but it's the difference between grabbing the correct cup on autopilot and reaching for a random coffee mug at 6 p.m. on a Tuesday.
Once you've served the rice, let the inner pot cool a bit, then soak it in warm water for a few minutes if any grains stuck to the bottom. Skip steel wool or abrasive sponges. Most inner pots have a nonstick coating that scratches easily, and scratches shorten the pot's life fast.
What is the correct water-to-rice ratio for a rice cooker?
Ratios shift depending on the rice you're cooking, and getting close matters more than getting exact. Here's a practical starting chart, with the understanding that your specific cooker's markings should always win if they conflict with these numbers.
White rice generally lands in the 20 to 30 minute range while brown rice takes noticeably longer, since its intact bran layer slows water absorption, a distinction Food Network points out when comparing standard and quick cycles.
Remember that most rice cooker cups measure around 180 mL, closer to ¾ of a US cup than a full one. If a recipe or online chart gives you a ratio written for standard US cups, either convert it or, easier, ignore US-cup math entirely and just fill to your cooker's inner-pot line for the number of cups you measured with its own cup, as Good Housekeeping recommends.
Fine-tuning from there is simple. If your rice consistently comes out a little firm for your taste, add water in small increments, roughly a tablespoon per cup of rice, the next time you cook that same variety. If it comes out too soft or sticky, cut back the same small amount. Soaking rice for 20 to 30 minutes before cooking helps basmati and brown rice cook more evenly, since it gives the tougher outer layers a head start on absorbing water before the heat kicks in.
Common rice cooker mistakes beginners make (and how to fix them)
Nearly every rice cooker disaster traces back to one of a handful of repeat offenders. Here's what tends to go wrong and how to recover in the moment.
- Using the wrong measuring cup. A standard US cup holds about 237 mL, well over the roughly 180 mL rice cooker cup. Grab a random kitchen cup instead of the one that came in the box, and you'll throw off your entire water ratio without realizing why.
- Skipping the rinse. Unwashed rice carries surface starch that turns the finished product gummy and clumpy. If you've already skipped it and the rice is sticky, there's no perfect fix mid-cook, but note it for next time and rinse harder.
- Over-rinsing delicate grains. Scrubbing too aggressively, especially with short-grain or sushi rice, can break grains and make the texture mushy in a different way. Gentle swirls, not vigorous scrubbing, is the move.
- Opening the lid mid-cycle. Every peek releases steam the rice needs to finish cooking evenly. If you've already opened it, just close the lid immediately and let the cycle continue; a single quick peek rarely ruins the batch.
- Overfilling past the max line. Rice cookers foam and can bubble over if you exceed capacity, especially with starchier varieties. If it's already overflowing, wipe up any spill around the base right away to avoid it burning onto the heating element.
- Undercooked, dry-centered rice. Add a small splash, about 1 to 2 tablespoons of hot water, close the lid, and let it sit on Keep Warm for 5 to 10 minutes. This finishes the grains without scorching the bottom.
Skipping the rest period is one of the most overlooked mistakes of the bunch, since it costs nothing but a few extra minutes yet meaningfully changes how the rice holds together on the plate, a point WebstaurantStore's guide to rinsing and resting backs up directly.
What else can you make in a rice cooker besides plain rice?
Once plain rice feels automatic, a rice cooker turns into a low-effort tool for a handful of other jobs. None of these require new equipment, just a little confidence.
- Broth instead of water. Swap in low-sodium chicken or vegetable broth for some or all of the water for a flavor boost with zero extra steps.
- Salt and fat. Stir in ¼ to ½ teaspoon of salt per cup of dry rice before cooking, plus a small pat of butter or a teaspoon of oil, which adds shine and keeps grains from clumping.
- Steamed vegetables or eggs. Many cookers include a steaming tray that sits above the rice, letting you steam broccoli, carrots, or eggs while the rice cooks below.
- One-pot combos. Toss in frozen peas, diced carrots, or shredded chicken along with your broth and rice for a simple hands-off meal; check out more one-pot dinner ideas if you want to build on this.
- Leftover storage. Cooked rice keeps in the fridge for about four days in a sealed container. If you're not sure what to do with extra, leftover rice soup is a quick way to use it up.
Pro Tip: Don't leave rice sitting on Keep Warm for hours on end. It's fine for the first hour or two, but beyond that the grains slowly dry out and toughen, even though the machine will happily hold that temperature indefinitely.
If you're regularly cooking risotto, paella, or anything that needs active stirring and precise heat control, a stovetop pot still beats a rice cooker. For everything else, the set-and-forget approach wins.
How Adulting in the Kitchen builds your rice cooker confidence
Getting comfortable with a rice cooker is really about repetition. Cook the same rice a few times, notice what you'd tweak, and the guesswork disappears fast. That's the same principle behind everything AdultingintheKitchen teaches.
- The Starter Pack walks you through the tools worth owning, so you're not measuring rice with a coffee mug because nobody told you the difference.
- Weekly recipe drops give you five new dishes to practice on, building the same kind of small repeated wins that make rice-cooker basics stick.
- Grocery checklists take the "what do I even buy" stress out of stocking a kitchen for staples like rice, broth, and aromatics.
- Real chef support means you can ask a real person why your rice came out gummy instead of guessing alone.
If you want to compare methods, stovetop rice technique is worth trying once you've got the rice cooker down.
A short pep talk for new independent cooks
Nobody nails rice on the first try, and that's fine. Give yourself one week: cook the same type of rice twice, note what you'd change, and adjust the water by a spoonful next time. That's the whole learning curve, condensed.
Pick one small habit and stick to it, like keeping the measuring cup tucked inside your rice bag so you're never hunting for it. Then, once white rice feels boring in the best way, cook a batch of jasmine and a batch of brown rice back to back. You'll notice the timing and texture differences immediately, and that's when rice cooker basics stop feeling like instructions and start feeling like instinct.
— Bill
Want guided practice instead of trial and error?
This kind of membership is built for exactly this moment: the point where you've got the basics down but want a real person checking your work instead of guessing alone through recipe after recipe. Where a stack of free blog posts leaves you piecing together conflicting ratios and hoping for the best, a membership can provide weekly recipe drops, grocery checklists that take the shopping stress off your plate, and chef support when your rice turns out gummy and you're not sure why.

A starter pack can walk you through the kitchen tools worth buying, so you stop wasting money on gadgets you'll never touch again. If you're ready to build real cooking confidence beyond just rice, check out the membership details and see what a week of guided practice actually looks like.
Sources
- How to cook perfect rice in a rice cooker — Good Housekeeping
- How to use a rice cooker, according to a chef — Real Simple
- Back to basics: conventional rice cookers — Zojirushi blog