Pick one meal, lunch or dinner, and one prep day this week. Follow a simple 1-hour component routine (one protein, one grain, two vegetables), and you'll walk away with four to six ready-to-eat meals in a single session. You'll save real time immediately, and once that first week clicks, you can scale up to breakfasts, snacks, or a full week of dinners.
TL;DR:
- Meal prep that focuses on component ingredients offers maximum flexibility and is most suitable for beginners to avoid boredom and waste.
- Starting with just one meal type and simple recipes within a 60 to 90-minute window increases consistency and likelihood of long-term adherence.
- Proper organization, shared ingredients, and minimal tools are key to preventing frustration and ensuring efficient, successful prep sessions.
- Popular beginner recipes include sheet-pan chicken thighs, roasted vegetables, and batch-cooked rice, which can be easily varied with different sauces.
- Storage guidelines recommend consuming prepped foods within 3 to 4 days, with tips to prevent sogginess and optimize freshness.
Table of Contents
- What Is Meal Prep, and Which Style Fits You?
- Does Meal Prep Actually Save Time and Money?
- How Do You Plan and Shop for Your First Prep Session?
- What Does a Beginner's 1-Hour Meal-Prep Routine Look Like?
- What Should Your First Beginner-Friendly Recipes Be?
- How Long Does Prepped Food Actually Last?
- What Mistakes Do Most Beginners Make?
- How Does Adulting in the Kitchen Support Beginners Learning to Prep?
- How Do You Balance Nutrition and Portions When Prepping?
- How Do You Meal Prep Around Dietary Restrictions?
- How Should Meal Prep Look Different for One Person vs. a Family?
- A Note From Bill on Starting Small
- Ready for Guided Support Beyond This Guide?
- Sources
What Is Meal Prep, and Which Style Fits You?
Meal prep just means cooking food ahead of time so future you isn't stuck deciding what to eat at 6 p.m. on a Tuesday with an empty fridge. But "meal prep" covers a few different approaches, and picking the wrong one for your life is the fastest way to quit by week two.
- Component prep: You cook individual ingredients (a protein, a grain, two vegetables) separately, then mix and match them into different meals through the week. This is the most flexible option, and it's the best starting point for most beginners because you never get bored eating the exact same plate five days running.
- Full-meal prep: You assemble complete meals in containers, ready to grab and reheat. Great if you like structure and don't want to think at all during the week, but less forgiving if your schedule shifts.
- Batch cooking: You make one large recipe (a big pot of chili, a tray of lasagna) and portion it out. Best for families or anyone who genuinely loves the same comforting dinner two or three nights in a row.
- Freezer meals: You prep and freeze fully assembled meals weeks in advance. Ideal for stocking up when you have a rare free Sunday, or for parents building a backup stash for busy weeknights.
A single parent with 20 minutes to spare might lean toward batch cooking. A college student sharing a mini fridge is often better off with component prep. There's no single correct system here, and pros in this space consistently say personalizing your approach to your schedule and skill level matters more than picking the "right" method.
Does Meal Prep Actually Save Time and Money?
Yes, and the payoff shows up faster than most beginners expect. When your lunch and dinner are already cooked, you cut out the daily "what's for dinner" scramble entirely, which means fewer impulse takeout orders and less standing in front of the fridge at 7 p.m.
The financial upside comes from buying in bulk and reusing ingredients across multiple meals instead of letting half a bag of spinach rot in the crisper drawer. A rotisserie chicken becomes tacos on Monday and a grain bowl on Wednesday, using the same base ingredient two different ways.
Making balanced, portion-controlled meals available at home reduces how often you reach for convenience food, which is one reason meal prep supports weight management for people trying to eat more consistently.
That said, don't expect to overhaul your entire diet in one Sunday session. Start with:
- One meal type only (lunch or dinner) for your first two to three weeks
- Two to three recipes you already know you like
- A realistic prep window of 60 to 90 minutes
Consistency beats ambition here. A modest lunch prep you actually repeat every week beats an elaborate five-course plan you abandon after one try.
How Do You Plan and Shop for Your First Prep Session?
Getting organized before you touch a single pan is what separates a smooth Sunday from a frustrating one. Here's the checklist to run through before you start cooking.
1. Pick your prep day and prep window. Sunday afternoon works for most people, but Monday evening or a slow Saturday morning is just as valid. Decide upfront whether you're prepping for two days or the full five, since that determines how much you'll shop and cook.
2. Build a grocery list around shared ingredients. Choose a protein, grain, and vegetable combo that can repeat across two or three meals instead of buying a totally different ingredient set for each one. This is where the real money savings kick in.
3. Check your pantry before you shop. You likely already have olive oil, salt, garlic powder, and a basic seasoning blend. Shopping your own cabinet first avoids duplicate purchases.
4. Gather your tools. You genuinely don't need much:
- A sheet pan (for roasting protein and vegetables together)
- A medium pot with a lid (for grains and beans)
- One sharp knife and a stable cutting board
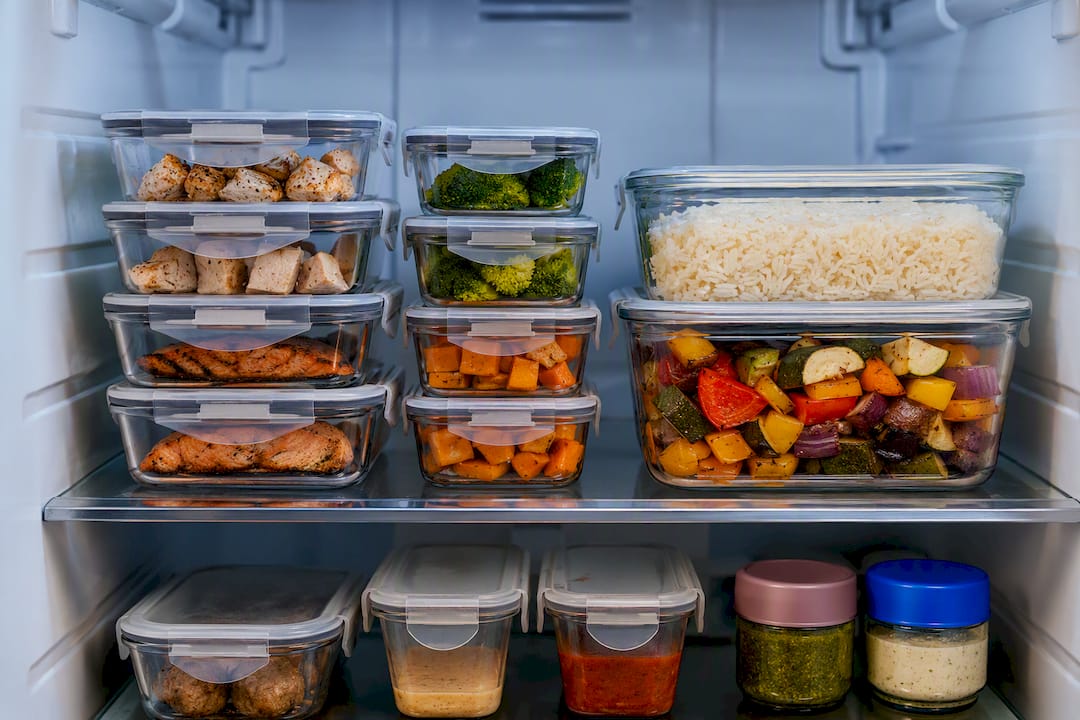
- Six to eight airtight containers
For containers, look for microwave-safe options in single-portion sizes, since reheating a portion straight in its container beats transferring food to a plate every day. Small sauce cups or a container with a built-in divider keep dressings and sauces from turning your grain bowl soggy by Wednesday.
Want a more detailed weekly framework once you've got the basics down? A cooking planner guide for beginners can help you build out a repeatable weekly rhythm, and pairing that with a habit tracker layout makes it much easier to keep your prep day consistent from one week to the next.
What Does a Beginner's 1-Hour Meal-Prep Routine Look Like?
The whole point of this system is running tasks in parallel instead of cooking one thing, waiting, then starting the next. Here's a real timeline you can follow on day one.
- Minute 0 to 5: Preheat your oven to 400°F. Toss your protein (chicken thighs or tofu) with oil and seasoning, spread on a sheet pan.
- Minute 5 to 10: Get your grain going. Rice, quinoa, or farro in a pot with water, covered, on the stove.
- Minute 10 to 15: Chop two vegetables (broccoli, bell peppers, or whatever's on sale) and toss with oil and salt.
- Minute 15: Protein goes into the oven for 20 to 25 minutes.
- Minute 20 to 35: While the protein roasts, your grain finishes on the stove. Use this window to wash containers or mix a quick sauce.
- Minute 35: Swap the protein out, add your chopped vegetables to the same sheet pan, and roast for another 15 to 20 minutes.
- Minute 55 to 60: Everything comes out together. Portion into containers.
This lines up closely with the formula dietitians recommend: roughly three proteins, three vegetables, and three carb sources rotated across the week, so you're never repeating the exact same plate.
Pro Tip: Sheet-pan roasting is the single highest-impact trick for beginners because it cooks your protein and vegetables in the same pan with almost no extra cleanup, and dietitians specifically point beginners toward it over more complex multi-pan recipes.
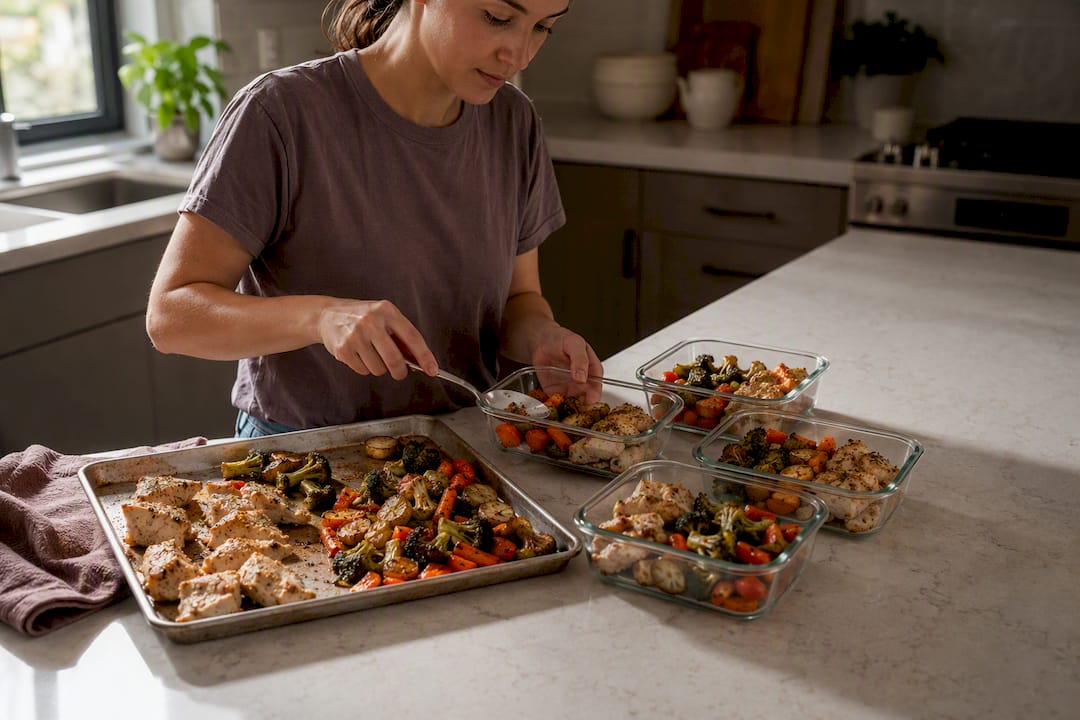
Frozen vegetables skip the chopping step entirely and roast just as well as fresh, so keep a bag on hand for weeks when you're short on time. A sheet-pan dinner is genuinely one of the easiest formats to build your first few prep sessions around.
What Should Your First Beginner-Friendly Recipes Be?
Keep your opening lineup boring on purpose. Boring means repeatable, and repeatable means you'll actually do it again next Sunday.
- Sheet-pan chicken thighs: Olive oil, salt, pepper, and paprika, roasted at 400°F for about 25 minutes. Works hot, cold, or shredded into a wrap.
- Stovetop brown rice: One part rice to two parts water, simmered covered for 40 minutes. Batch it once and it anchors four different meals.
- Roasted mixed vegetables: Broccoli, carrots, and bell peppers, tossed in oil and roasted for 20 minutes. Swap in whatever's cheapest that week.
From there, build out the rest of the day:
- Breakfast: Overnight oats in mason jars, or a batch of hard-boiled eggs that hold for a week.
- Lunch: Grain bowl with your prepped rice, roasted vegetables, and a protein, topped with a quick sauce.
- Dinner: The same base components, reheated with a different sauce so it doesn't taste like leftovers.
- Snacks: Cut vegetables with hummus, or a handful of nuts portioned into small containers.
The trick to avoiding boredom without cooking five separate recipes is swapping the sauce, not the ingredients. A lemon tahini dressing one night and a spicy peanut sauce the next turns the same chicken, rice, and broccoli into two completely different meals. If lunch is your priority, a dedicated lunch prep formula can help you nail portion sizes without overthinking it.
How Long Does Prepped Food Actually Last?
This is the part beginners get wrong most often, either by tossing food that's still perfectly good or by eating something that sat too long. General storage windows for common prepped items look like this:
These ranges follow storage guidance from the Nutrition Source at Harvard's Chan School of Public Health, and official FDA food-safety guidance backs up the cooling and storage practices behind them.
A few practical habits make these windows reliable:
- Cool food to room temperature before sealing containers, but don't leave it out longer than two hours.
- Label every container with the date it was cooked, not the date you plan to eat it.
- Rotate stock so older containers get eaten first, front of the fridge, oldest first.
Skip prepping dressed salads (they wilt fast), delicate fruit like sliced avocado or berries, and anything meant to be crispy, since fried or breaded foods turn soggy in the fridge within a day. Reheat rice and grains with a splash of water to bring back moisture the microwave tends to steal.
What Mistakes Do Most Beginners Make?
Almost every meal-prep dropout traces back to one of a handful of avoidable mistakes.
- Over-prepping on session one. Trying to cook five different recipes in one afternoon is exhausting, and it's the top reason beginners abandon meal prep within the first few weeks.
- Skipping the plan and just cooking whatever's around. Without a grocery list built around shared ingredients, you'll end up with mismatched leftovers and a wasted trip to the store.
- Using the wrong containers. Glass containers without dividers let sauces bleed into everything else, and flimsy plastic doesn't survive multiple reheats.
- Prepping texture-sensitive foods. Crispy roasted potatoes and dressed greens rarely survive four days in the fridge.
The fix for nearly all of these is the same: start with one meal type, one grocery list, and one repeatable recipe combo. Add complexity only after that first routine feels automatic.
Pro Tip: Slightly undercook vegetables during your prep session. They'll finish softening in the fridge and again when reheated, so starting a little firm keeps them from turning mushy by day three.
How Does Adulting in the Kitchen Support Beginners Learning to Prep?
Everything covered above (the planning checklist, the 1-hour routine, the storage rules) is the kind of guidance some cooking memberships aim to reinforce week after week. A starter pack can walk new cooks through kitchen setup and tool basics, weekly recipe updates can deliver new dishes designed to fit into a repeatable prep rhythm, and grocery checklists can take the guesswork out of shopping for shared ingredients. Access to chef support can help answer questions that arise when recipes don't turn out right or don’t feel done, instead of leaving cooks to guess.
How Do You Balance Nutrition and Portions When Prepping?
A simple way to build a balanced plate without counting a single calorie is the plate-split method: fill half your container with vegetables, one quarter with a protein, and one quarter with a grain or starch. This keeps meals filling without requiring any math, and it naturally caps portion sizes since your container only has so much room.
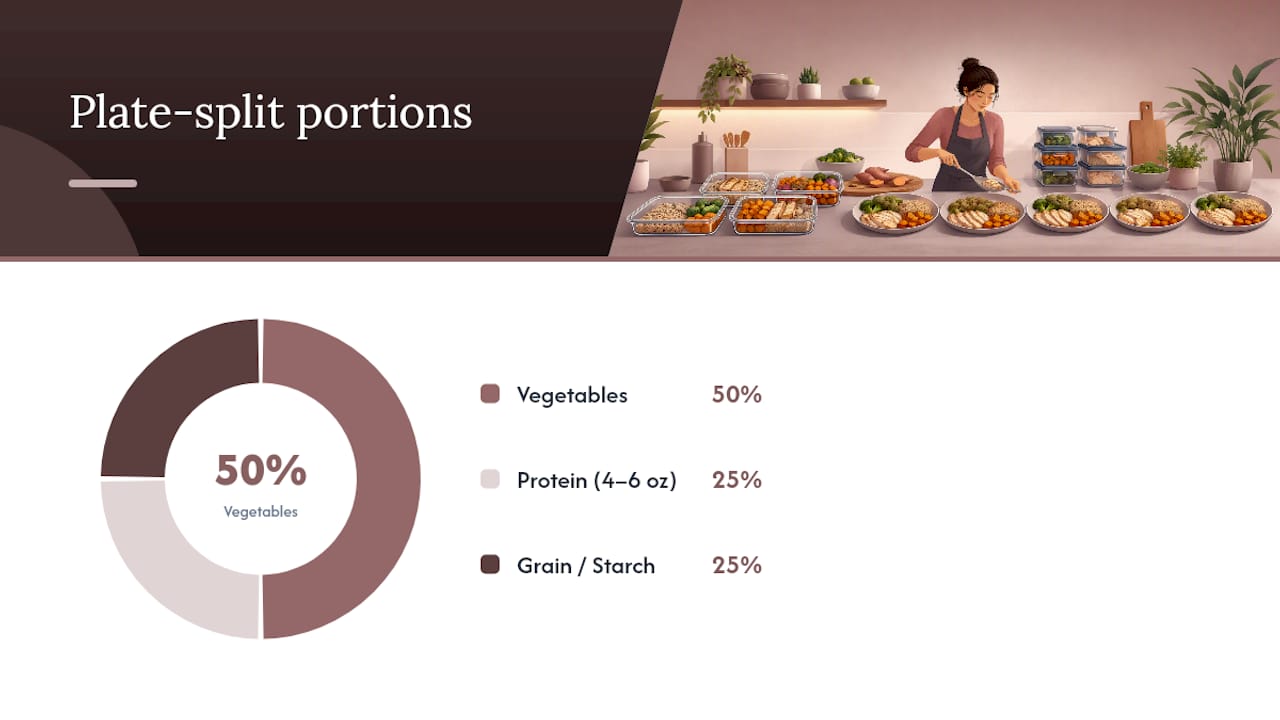
Standard containers with built-in sections make this almost automatic, since you physically can't overload the protein compartment without shortchanging the vegetables. If you're prepping for weight management specifically, lean toward containers in the 3 to 4 cup range rather than the oversized ones, since a bigger container tends to get filled simply because it's there.
Protein is worth paying extra attention to, since it's what keeps a prepped meal satisfying after two days in the fridge. Aim for a palm-sized portion, roughly 4 to 6 ounces, per meal. Sauces and dressings deserve their own small container rather than getting poured over everything in advance, both for texture reasons and because it's far easier to control how much you're actually eating when you add it yourself at the table.
Don't treat every meal as needing to be identical in composition. A lunch heavier on vegetables and lighter on grains, paired with a more substantial dinner, still averages out to a balanced day without forcing every single container into the same mold.
How Do You Meal Prep Around Dietary Restrictions?
The component-prep method genuinely shines here, since cooking proteins, grains, and vegetables separately means everyone at the table can build their own plate. A household with one vegetarian and one meat eater doesn't need two separate cooking sessions. It just needs a plant-based protein like lentils or tofu prepped alongside the chicken, using the same vegetables and grain for both.
For gluten-free eaters, swap grains like quinoa or rice in for wheat-based pasta or couscous, both of which prep and reheat just as well. Dairy-free households can build sauces around tahini, olive oil, or coconut milk instead of yogurt or cream-based dressings, which also tend to hold up better across several days in the fridge anyway.
Low-carb or higher-protein eaters can simply shift the plate-split ratio, doubling the vegetable and protein portions while cutting the grain down to a small side or skipping it entirely. Because the base components stay separate until you assemble the meal, adjusting for one person's needs doesn't require cooking a whole different set of dishes for everyone else.
The one rule that matters across every restriction: label containers clearly, especially in a shared kitchen, so nobody accidentally eats someone else's allergen-free portion or grabs the wrong sauce.
How Should Meal Prep Look Different for One Person vs. a Family?
Prepping for one person is really about portion control and variety, not volume. Buying family-sized packs of chicken or rice when you're the only one eating it just leads to freezer clutter and forgotten containers, so it's worth shopping in smaller quantities even if the per-unit cost is slightly higher. A meal-planning system built for one can help you right-size your grocery list instead of defaulting to recipes written for four to six servings.
Family prep flips the math. Batch cooking becomes far more efficient here, since making one large tray of lasagna or a big pot of chili feeds everyone at once with a single cooking session instead of four separate ones. The family-focused benefits of meal prep show up clearly in busy households, where having dinner already prepped removes the daily scramble that hits right when everyone's hungriest and least patient.
Container strategy also shifts with household size. Singles do better with a stack of identical single-portion containers, while families benefit from one or two larger shared containers for sides (rice, roasted vegetables) alongside individual containers for proteins, since kids and adults often want different portion sizes. Either way, the underlying system stays the same: cook components separately, shop for shared ingredients, and prep only as much as you'll actually eat before it goes bad.
A Note From Bill on Starting Small
The biggest mistake I see beginners make isn't a cooking mistake at all. It's trying to prep an entire week of perfectly balanced meals before they've even nailed one. Pick a single lunch, put it on your calendar, and let it be a little imperfect. A rough first attempt that gets repeated beats a flawless plan that never happens twice.
— Bill
Ready for Guided Support Beyond This Guide?
Everything in this guide gets you through your first few prep sessions on your own. If you'd rather have someone walk alongside you as you build real cooking skills instead of piecing it together from articles, some cooking memberships are designed to provide that support. Memberships may offer starter packs for kitchen setup, weekly new recipes designed around component-based cooking, grocery checklists to simplify shopping, and direct support for recipe questions.
If the 1-hour routine above felt good but you want more recipes, more structure, and an actual person to ask when something goes wrong in your kitchen, check out the Adulting in the Kitchen membership and see what the Starter Pack includes.